What the matchup page is
The matchup page is the core research tool on CageQuant. It puts two fighters side by side and surfaces where the data shows a meaningful difference between them.
It does not tell you who wins. It tells you where each fighter holds an edge, how confident the data is, and what structural factors are in play. What you do with that is up to you.
Every number on the page comes from UFC fight data. Derived stats are computed from that data, not from model outputs or subjective ratings.
How the page is organized
The page is divided into four chapters, read top to bottom.
Identity gives you the fighters at a glance. Style, physical attributes, recent form, and market odds if available.
Core Edges is the analytical summary. This is where CageQuant surfaces the dimensions where one fighter has a statistically meaningful advantage over the other.
Deep Dive breaks down the striking, grappling, finishing, and pace data in detail. Use this to pressure-test what the edges section is telling you.
Historical Context shows fight logs and common opponents. Use this to understand how each fighter arrived at their current profile.
Identity
Fighter cards
The two fighter cards at the top show record, style classification, physical stats, stance, age, and recent form. The style badge is derived from each fighter's actual output across striking and grappling dimensions. Hover over it for the definition.
Recent form is shown as a row of dots, most recent first. Green is a win, red is a loss. Opacity fades as you go further back.
The VS spine between the cards shows the division, weight limit, and scheduled rounds. Title fights are highlighted in amber.
Odds
When Polymarket odds are available for the fight, they appear below the fighter cards as implied win probabilities. These are market prices, not CageQuant projections.
Data confidence banner
When either fighter has two or fewer UFC fights, a banner appears below the odds strip. It tells you exactly what the data situation is before you read anything else.
The banner is not a warning to stop reading. It tells you which side of the comparison to trust and which to hold loosely.
The Takeaway Strip
The Takeaway Strip sits below the fighter cards and gives you the page's top-level read at a glance. It only appears when at least one fighter has three or more UFC fights.
The outcome label
The first thing in the strip is the outcome label. This is the clearest plain-language summary CageQuant can offer given the data. Hover it to see the reasoning.
Chips
To the right of the outcome label are chips. Each chip flags something specific worth knowing before you read deeper.
Risk chips flag a structural vulnerability for one fighter in this specific matchup. A filled dot means the vulnerability is confirmed by UFC history. An empty dot means it is structural in the stats but has not been repeatedly tested at this level.
Data chips appear when the record is thin. They mirror the confidence banner but at a glance.
The six tiles
Below the chips is a row of six tiles. Each one shows whether a fighter holds an edge in that dimension, and how large the edge is.
The first two tiles are win-predictors. These are the dimensions most directly tied to fight outcomes.
The remaining four tiles describe fight shape. They tell you how the fight might end, not necessarily who wins.
Each tile shows a magnitude label when an edge exists: Dominant, Clear edge, or Slight edge. When no meaningful edge exists, the tile shows a dash.

A "No edge" tile is not a data error. It means the stat is too close to call or the sample is too small to declare a winner. Both are meaningful reads.
Signals
Signals are matchup-specific observations that fire when a specific condition is met in the data. They appear as tagged cards below the Takeaway Strip.
Each signal has a colored tag and one or two sentences of plain-language context. The tag tells you the category. The text tells you what it means for this fight.
Signals only appear when there is a meaningful asymmetry. If both fighters share the same condition, no signal fires.
Signals are observations, not predictions. A CARDIO signal means one fighter's output drops late. It does not mean the fight will go late, or that the opponent will capitalize on it.
When one or both fighters are making their UFC debut, a separate set of debut signals appears in place of the standard signals. These draw only from biographical data such as stance, reach, and age, since no UFC fight data exists.
Core Edges
Core Edges is the main analytical section. It shows four derived comparisons, each with a winner badge, raw values for both fighters, and a one-line insight.
Striking Differential
Net strikes landed per minute minus strikes absorbed per minute. A positive value means the fighter lands more than they absorb. A negative value means they absorb more than they land.
The edge badge only appears when the gap between fighters is wide enough to be meaningful. A narrow gap shows "No edge."
Grappling Threat
Each fighter's takedown rate adjusted for the specific opponent's takedown defense. This makes it matchup-specific rather than a raw career average. A fighter with a high takedown rate against poor defenders looks different against someone who stops takedowns at an elite level.
The edge is suppressed when either fighter has two or fewer UFC fights. Takedown defense at that sample size is not reliable enough to use as a multiplier.
Decision Advantage
The percentage of individual rounds each fighter wins across their UFC career, scored by CageQuant's round model. When fights go the distance, this is the clearest predictor of who the scorecards favor.
Durability
A score reflecting each fighter's KO exposure history in the UFC. Higher is better. The score is suppressed for fighters with a clean record and fewer than six UFC fights, since a short clean record does not distinguish a durable chin from an untested one.
The edge badge on durability is only meaningful alongside the KO Advantage tile. Durability alone does not tell you who wins.
Below the four cards
Pace Index shows the combined output of both fighters. This is not a per-fighter stat. It tells you how much volume this specific matchup is likely to generate, and what that means for how the fight plays out.
Cardio Pattern shows each fighter's output shape across rounds. It tells you whether a fighter's volume builds, holds steady, or drops as the fight extends.
Finish History shows the win and loss method breakdown for each fighter as mirrored bars. KO/TKO in red, submissions in violet, decisions in gray. Use this to understand how each fighter typically wins and loses.
Opposition Quality
Opposition Quality breaks each fighter's UFC record down by the caliber of opponent they have faced. A fighter with a strong overall record looks different if most of those wins came against opponents with losing records.
Each fighter gets a card showing their record and striking performance split across up to three opponent tiers.
Each tier block shows three numbers: record in that tier, striking differential per minute against those opponents, and finish rate in wins against them. A fighter who wins at a high clip but posts a negative striking differential against veterans is performing differently than their overall numbers suggest.
The Step-Up delta appears on the veteran tier when a fighter has faced enough qualifying opponents to be meaningful. It shows how their win rate and striking output against veterans compares to their career average. A negative step-up delta means performance drops against experienced competition. A positive means they hold up or improve.
A tier showing "Not enough qualifying fights" means the fighter has not faced enough opponents at that level to generate a reliable sample. This is common for younger fighters and is itself informative.
Deep Dive
The Deep Dive section breaks down the underlying data behind the edges. Four tabs, each covering a different dimension.
Striking
Stat bars compare each fighter head to head on the key striking metrics: KO Power, strikes landed per minute, strike accuracy, strikes absorbed per minute, and strike defense.
Each bar is scaled to the 95th percentile of their division, not a universal ceiling. A fighter at the far right of a bar is among the best in their weight class at that stat, not across all of MMA.
A tick mark on each bar shows the division average. Use it to understand whether a number is strong, average, or weak for that weight class.
Below the stat bars, two additional sections give you more texture.
Division Percentile Ranks shows where each fighter sits within their weight class across six key dimensions: striking differential, grappling threat, round win rate, takedown defense, durability, and finishing rate. These are percentile positions, not raw scores. A fighter in the 80th percentile beats 80% of their division on that stat.
Recent Form compares each fighter's last three UFC fights against their career average across striking output, accuracy, volume absorbed, and takedown accuracy. Green arrows indicate improvement. Orange indicates decline. A large orange shift flagged with a warning mark is worth paying attention to -- it suggests a meaningful change in recent performance, not just noise.
The strike zone breakdown shows how each fighter distributes their output by target (head, body, leg) and position (distance, clinch, ground). Use this to understand where each fighter likes to work and where they are most active.
Grappling
Stat bars cover takedown rate, takedown attempts, takedown accuracy, takedown defense, submission attempts, and control time. The same division scaling and average tick marks apply as in the striking tab.
Below the bars, a prop dot chart shows takedowns landed and absorbed on a fight-by-fight basis. You can toggle between landed and absorbed, and adjust the window to look at the last 3, 5, or 10 fights. Use the window controls to see whether a fighter's grappling output has changed recently.
UFC Grappling Totals at the bottom shows cumulative counts across the fighter's full UFC career: takedowns landed and attempted, takedowns stopped out of opponent attempts, submission wins out of attempts, and submission escapes out of times threatened. The submission defense rating summarizes how each fighter has handled being on the receiving end of submission attempts.
Finishes
The Finishes tab is built around two questions: how does each fighter win and lose, and where does a finish become likely in this specific matchup.
Outcome Signal at the top restates the page-level read from the Takeaway Strip, contextualizing the finish probability for this fight specifically.
Fight Shape shows the combined goes-to-distance rate for both fighters and a lean toward finish or decision based on their historical rates. This is a baseline expectation, not a prediction.
CQ Finish Risk is the most detailed section on this tab. It scores KO danger and submission danger in both directions -- each fighter as the attacker against the other as the defender. Each score is directional and matchup-specific.
KO Threat
The KO score measures how likely a fighter is to stop a specific opponent by KO or TKO. It is not a standalone stat. It reflects two things together: the attacker's finishing ability and the defender's history of absorbing damage.
A higher score means the combination of finishing threat and opponent vulnerability is elevated in that direction. The score runs from 0 to 100 and is labeled by tier.
Supporting stats shown below the score: knockdowns landed per 15 minutes and KO finish rate for the attacker, knockdowns absorbed per fight and KO loss rate for the defender.
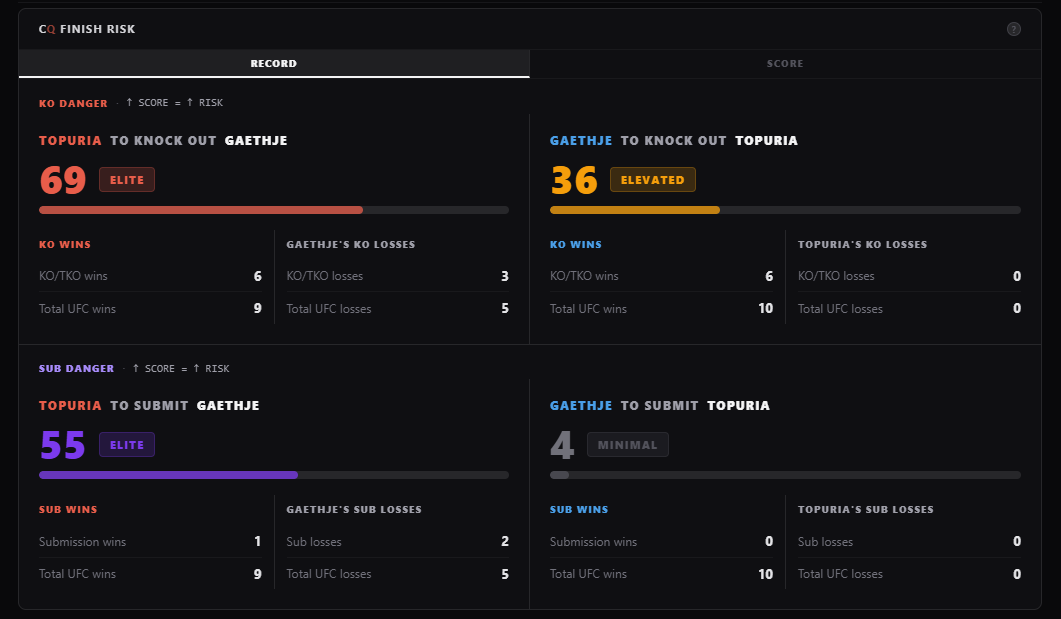
When a score is labeled "estimated," it means one side of the calculation is based on limited UFC data and the prior plays a larger role. Treat estimated scores with more caution than scores backed by a full UFC record.
Submission Threat
The submission score works the same way as the KO score but in the grappling dimension. It combines the attacker's submission activity with the defender's history of being threatened and tapped.
A fighter who hunts submissions frequently but faces a defender who has never been tapped is a different threat level than one facing a fighter with multiple submission losses. The score reflects that difference.
Supporting stats: submission attempts per 15 minutes and submission win rate for the attacker, submission loss rate and the UFC grappling totals defense rating for the defender.
Win and Loss Method below the scores shows the method breakdown across each fighter's full UFC record as mirrored bars -- KO/TKO in orange, submissions in violet, decisions in gray. Each bar represents that method's share of wins or losses, not a cross-fighter comparison.
Finish Breakdown at the bottom plots each fighter's UFC finishes by round and method when data exists. Use this to see whether a fighter's finishes tend to cluster early or extend into later rounds.
Pace and Cardio
Round-by-round output bars for each fighter, side by side on a shared scale. This is where you see the Cardio Pattern classification come to life in the actual numbers.
The striking tab (default) shows significant strikes landed per minute and strikes absorbed per minute for each round. The data table below shows the net striking margin per round, color-coded green when positive and red when negative.
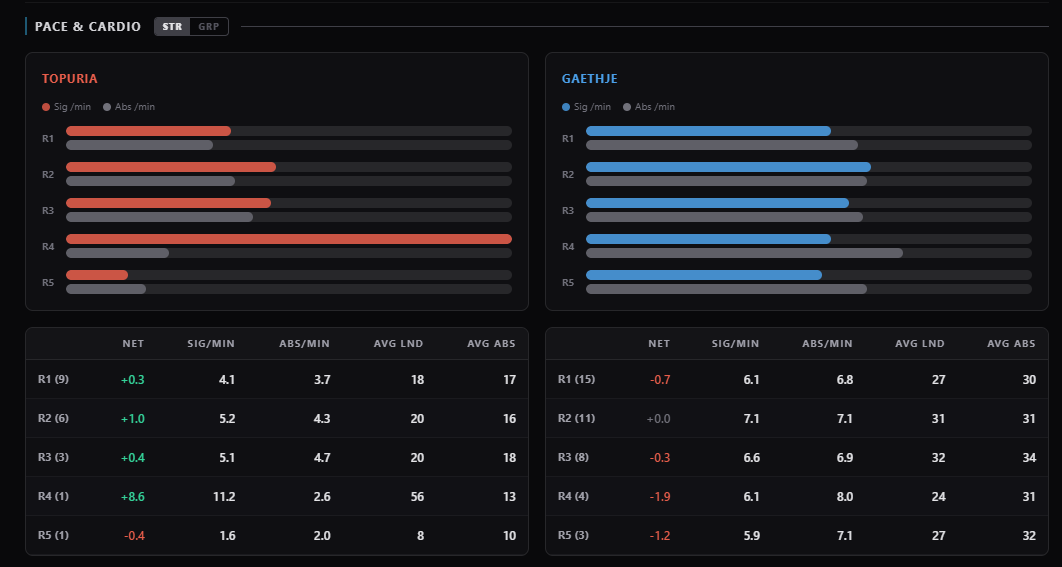
When grappling data exists, a second tab shows control time and takedown rate per round.
The sample size for each round is shown next to the round label. A round with only two or three fights behind it is less reliable than one with eight. Factor that in when reading late-round data for fighters who finish early often.
Historical Context
Fight logs
The fight log shows each fighter's recent UFC history side by side. Each row shows the opponent, result, method, round, and date.
Two additional details are worth noting. A performance grade (S through D) reflects how the fighter performed relative to their own output in that fight. An opponent quality badge (ELITE or VET) flags opponents who had a strong record at the time of the fight.
For fighters with two or fewer UFC fights, the log extends to include pre-UFC and tracked non-UFC history when available. This gives you a fuller picture of what the fighter has done before reaching the UFC.
The fight log shows what happened. It does not score the fights. A loss by decision against an elite opponent reads differently than a loss by KO against a gatekeeper.
Common opponents
When both fighters have faced the same opponent, a common opponents section appears. Each shared opponent is shown with both fighters' results side by side. A "Split result" badge in amber means one fighter won and the other lost. "Same result" means both got the same outcome.
Split results are sorted to the top. They are the most useful data point in this section.
Data confidence on the matchup page
The matchup page applies the same data tiers described in the Data and Updates guide, but with matchup-specific suppression rules on top.
Some stats and signals are unavailable for fighters with thin UFC records. When a field shows a dash or "No UFC data," that is intentional. A suppressed field is always preferable to a number that looks precise but is not.
When one fighter is well-profiled and the other is not, focus your research on the side you can trust. The well-profiled fighter's edges, style, and tendencies are reliable. What you are actually evaluating on the thin side is the pre-UFC record and biographical context.